Showing posts with label cookie. Show all posts

Thursday, May 2, 2013

Thin Mint Scones

THIN MINT SCONES


2 cups all-purpose flour
1/4 cup granulated sugar
2-1/2 tsp baking powder
1/4 tsp salt
1 stick unsalted butter, cold and cut into pieces
1 cup heavy whipping cream, very cold
1 sleeve thin mint cookies, chopped
1 egg [for egg wash]
2 Tblsp granulated sugar [for sprinkling on top]

  • Preheat oven to 425 degrees F.
  • Mix all the dry ingredients in a medium mixing bowl.
  • Using a pastry cutter or fingers (or make it really easy and use a food processor) to cut all the butter into the flour mixture.
  • Add cream and cookie bits and blend quickly and be careful to not over-blend.
  • Shape the dough into 8 or 9-inch round or square and cut into shapes.
  • Place on parchment sheet on a cookie pan.
  • Brush with wash and sprinkle with sugar.
  • Bake for 14-16 minutes or until golden brown on top!
recipe derived from SisBoomBlog.com

Thursday, April 11, 2013

Granola Cookie Wedge

GRANOLA COOKIE WEDGE


1/3 cup packed dark brown sugar
2 Tblsp canola oil
1 Tblsp butter, melted
1/2 tsp vanilla extract
1/4 tsp salt
1/4 tsp baking soda
1 large egg white
1/2 cup all-purpose flour
1/2 cup quick-cooking oats
1/4 cup pecans, chopped
2 Tblso semi-sweet chocolate chips

  • Preheat oven to 350 degrees F.
  • Combine first 7 ingredients in a large bowl; stir util well combined. Add flour, oats, nuts and chocolate chips to sugar mixture; stir until combined.
  • Scrape dough into 9-inch glass pie plate coasted with cooking spray, and spread to edges using spatula.
  • Bake at 350 degrees F for 13 to 15 min or until set. Cool slightly on wire rack. Cut into 8 wedges.

recipe from Cooking Light April 2013

Thursday, March 14, 2013

St Patrick's Day Food Ideas

Here are a few ideas of "green foods" that would be great for St Patty's Day!


Monday, March 11, 2013

Chocolate Chip Mug Cookie

Here is a "single serving" chocolate chip cookie made in the microwave in just a minute!

CHOCOLATE CHIP MUG COOKIE


1 Tblsp butter
1 Tblsp white sugar
1 Tblsp dark brown sugar
3 drops vanilla extract
1 egg yolk
1/4 cup (a slight less) all-purpose flour
2 Tblsp semi-sweet chocolate chips
Vanilla ice-cream

  • In a mug, melt butter in the microwave until just melted (not boiling).
  • Stir in sugars and vanilla.
  • Stir in egg yolk.
  • Stir in the flour, which is just slightly less than 1/4 cup.
  • Stir in chocolate chips.
  • Place in microwave and cook for 40-60 seconds, depending on your microwave. Do NOT cook over 60 seconds. It will continue to cook in the mug a little after taking it out.
  • Top with some ice-cream and eat immediately. 

Friday, February 8, 2013

OXO Cookie Press


As part of the fabulous giveaway, OXO sent a few of us their cookie press to try out and to create a recipe to share with all our wonderful readers.


My first impression (to be honest here) I was was a little bummed they sent a cookie press. I have one already, another popular name brand. And I wasn't that fond of the brand either...so I put it in the back of my cabinet and haven't used it since. So getting the OXO cookie press, I knew I had to create a cookie, as we promised on receiving their product. (So I did!)

First of all, I absolutely loved seeing all the different shapes that came with the basic set, but they also sent an additional case with more shapes....talk about SWEET! The kit came with a little instructional booklet that had a few recipes in the back. Out of experience, I knew I had to stick to something close to those to make sure the cookies kept their shape after being pressed on the pan. Kinda like making sure you use a good shortbread cookie recipe for cookie cutters.

So I dove into the kitchen and came up with a simple solution. I used the provided "Butter Cookie" recipe and then ADDED a kool-aid packet to change up the flavor. It worked! And there are SO many options! [recipe posted below]

After making the dough came the cookie press. I loved how easily the device came apart and together, and there wasn't any tiny pieces to try to keep up with. The entire device was very simple, easy to use. The shape disks were the winners here....the "other" cookie press disks had angled holes so it had to go in the press the right way otherwise it was all a mess. OXO created theirs without having to worry about that. (except the "words" disks...but those are easy to figure out which way to put in in order for it not to come out backwards) So that is definitely a plus!!

The device was so easy to "load" and then to use. Every single "click" there is a cookie. Its actually a really cool device, and so many options and designs to choose from. And however not all the parts are dish-washer safe, the "major" playing components are. But it was easy enough to clean by hand that I didn't need to stick it in the washer anyway.

So over all, I LOVE this cookie press. The other one I have is going to the thrift store. There are so many different flavor combinations I want to try, so it will be on my counter for a while. But here is the recipe from the booklet plus the koolaid pouch.

BUTTER COOKIES


1-1/2 cups (3 sticks) unsalted butter, at room temp
1 cup sugar
1/2 tsp salt
2 large eggs, at room temp
1 tsp vanilla extract
4 cups all-purpose flour
1 packet kool-aid, your choice of flavor [I used black cherry! yum!]

  • Preheat the oven to 400 degrees F.
  • In a large mixing bowl, cream together butter, sugar and salt. Beat until light and fluffy. Add vanilla and eggs one at a time, continuously beating. Beat in kool-aid packet until well blended.
  • Gradually add flour, beating until well incorporated.
  • Place dough in cookie press with desired disk. Press dough out onto an ungreased baking sheet.
  • Bake for 8 to 10 minutes or until the cookies are golden brown on the edges. Rotate baking sheet halfway through baking time. [I didn't, and they still turned out fine!]

My favorite disk was the rose one! Add sprinkles before putting them in the oven for a special touch!

ENTER FOR YOUR CHANCE TO GET 
A COOKIE PRESS FOR FREE!


Tuesday, December 13, 2011

#13 Peanut Butter Cookies [feature!]

I saw these cookies and wanted to make them part of my 25 days of Christmas sweets! These come from Kim of The Misplaced Midwesterner, so make sure you hop over and show her some comment love!


PEANUT BUTTER COOKIES

Click on image to directly see post
1 cup sugar
1 cup peanut butter
1 egg
Sugar

1. Preheat oven to 375 degrees F. Grease cookie sheets and set aside. In a medium bowl, stir together the 1 cup sugar, the peanut butter, and egg until well mixed. Using your hands, roll peanut butter mixture into 1-inch balls; place 2 inches apart on prepared cookie sheets. Flatten each ball slightly with a drinking glass that has been lightly greased and dipped in sugar. Lightly grease a small star-shaped cookie cutter; dip in sugar. Press into the center of each cookie.

2. Bake about 9 minutes or until edges are set and bottoms are lightly browned. Makes 36 cookies.

MY NOTES: I baked mine for 7 minutes because the 9 minute ones came out pretty dark and very crisp. I like mine to have some softness to them.

Thursday, December 8, 2011

#8 Raspberry Ribbon Cookies

I came across this recipe and HAD to add it on my list of Christmas sweets! Its from Kaitlin from AnnaBean, and stop by to see her amazing blog as well! Click on the image to link back to the original post.

Raspberry Ribbon Cookies


What You'll Need:

Cookie:   1 cup butter, softened
                 1/2 cup sugar
                 1 egg
                 1 teaspoon vanilla
                 2 1/4 cups flour
                 1/2 teaspoon baking powder
                 1/4 teaspoon salt
                 1/2 cup raspberry jam

Glaze:     1 cup confectioners sugar
                2 tablespoons evaporated milk
                1/2 teaspoon vanilla extract

Ready, Set Go!

1. Cream butter and sugar. Beat in egg and vanilla. Combine the flour, baking powder and salt. Gradually add to cream mixture and mix well.

2. Divide dough into 4 portions; shape each into a 10 x 2.5" log. Place logs 4" apart on greased or foil-lined baking sheets. Make a 1/2" depression down the center of each log.

3. Bake at 350 degrees for 10 minutes.

4. Fill depressions with jam. Bake another 10-15 minutes longer or until lightly browned.

5. Cool for 2 minutes. Remove from baking sheet and place on cutting board. Cut log into 3/4" slices and place on wire racks.

6. In a small bowl, combine the glaze ingredients until smooth. Drizzle glaze over warm cookies and cool completely.

*If the bars are too hard to cut (they were for me), make them more than a 3/4" slice, or roll the cookie dough into 1" balls, indent with thumb and then follow the rest of the recipe. Works just as well! 

Tuesday, December 6, 2011

#6 PB & J Thumbprints


PB & J THUMBPRINTS


2/3 cup butter, softened
1/2 cup sugar
2 egg yolks
1 tsp vanilla
1-1/2 cups flour
2 egg whites, lightly beaten
1 cup cocktail peanuts, chopped finely
Creamy Peanut butter
Jar of grape jelly

  • In a large bowl, beat butter with electric mixer for 30 seconds. Add sugar. Beat until combined. Then beat in egg yolks and vanilla until combined. Beat in as much of the flour as you can with mixer, then mix in the remaining by hand. 
  • Cover and chill for about 1 hour.
  • Preheat oven to 375 degrees F.
  • Grease cookie sheets. 
  • Shape dough into 1-inch balls. Roll ball in beaten egg white and then roll in chopped peanuts.
  • Place balls 1-inch apart on cookie sheets. Using your thumb, make indentation in each dough ball.
  • Bake for 10 to 12 minutes or until bottoms are brown. Transfer to wire rack and cool completely.
  • Fill each thumbprint with 1/2 teaspoon creamy peanut butter and then with 1/2 teaspoon grape jelly. Serve immediately.
If saving for later use, store cookie without the filling in the middle stacked in an air-tight container with wax paper between layers.

The recipe is from Better Homes and Gardens Special Interest magazine Dec 2011 edition

Sunday, December 4, 2011

#4 Cherry Cheesecake Cookies

CHERRY CHEESECAKE COOKIES


1 6-oz jar maraschino cherries
1/2 cup butter, softened
1/2 cup shortening
1 3-oz package cream cheese, softened
2/3 cup sugar
1/2 tsp salt
1 egg
1/2 tsp almond extract
2 cups all-purpose flour
red food coloring
milk

  • Drain cherries, reserving juice. Pat cherries dry. Finely chop cherries; measure 1/3 cup. Spread cherries on paper towels, pat dry.
  • In a large bowl combine butter, shortening, and cream cheese. Beat with electric mixer for 30 seconds. Add sugar and salt. Beat until combined. Beat in egg and extract until combined. Gradually add flour, beating until combined.
  • Divide dough into 3 portions. Leave one portion plain. Into another dough portion, knead 1/2 tsp of the reserved cherry juice and enough red food coloring to make the dough light pink. Knead chopped cherries into remaining dough portion. Wrap each dough portion with plastic wrap. Chill for 2 hours.
  • Lightly flour three pieces of parchment paper. On each piece, roll a dough portion into a 6-inch square. Cover each portion with plastic wrap and freeze for about 30 minutes.
  • Place plain dough square on work surface; brush top with milk. Place pink square on top of plain square. Turn over and brush other side of plain square with milk; place chopped cherry square on top of that one. Evenly trim the edges and cut stack into 3 even portions; freeze for about 30 more minutes.
  • Preheat oven 275 degrees F. Line cookie sheets with parchment paper. Cut each block crosswise into 12 slices. Place slices on sheets. Bake for 10 minutes or until bottoms are lightly brown. Transfer to wire rack and cool completely.

The recipe is from Better Homes and Gardens Special Interest magazine Dec 2011 edition


Friday, December 2, 2011

#2 Dark Chocolate Candy Bar Bark

DARK CHOCOLATE CANDY BAR BARK
(that's a mouth full, huh?)


6-oz chocolate-flavor candy coating, chopped
6-oz dark chocolate, chopped
1 T shortening
2 cups assorted chocolate candy bars or candy (english toffee, malted-milk balls, goobers, snickers)

1/2 cup salted peanuts, chopped

  • Line baking sheet with heavy-duty foil; grease. 
  • Melt together chocolate candy coating, chocolate and shortening (double boiler or microwave). Stir in 1 cup of assorted chopped candy bars and peanuts into melted chocolate mix. 
  • Pour into prepared baking sheet. Spread evenly in a layer about 1/4 in thick. Sprinkle with remaining candy bars, lightly pressing them into chocolate mix. 
  • Chill for about 30 minutes or until firm. Use foil to lift candy out of pan. Break into pieces.
White chocolate candy bar bark: substitute with vanilla-flavor coating, white chocolate squares, and toasted almonds (instead of peanuts).

The recipe is from Better Homes and Gardens Special Interest magazine Dec 2011 edition


Thursday, December 1, 2011

#1 Cherry Thumbprint

So I'm trying this little segment out, but its a dooooozy. "25 days of Christmas Sweets." Originally it was "Christmas Cookies" but then I expanded my recipes to cover a bigger range. Yes, I will diet AFTER Christmas, but before then...enjoy! A new sweet will be posted EVERY DAY until Christmas (hopefully!!)!


Thumbprints are a new adventure for me. I don't know why I've never made them before of wanted to make before--they are actually really EASY and quite delicious!

CHERRY THUMBPRINTS


2/3 cup butter, softened
1/2 cup sugar
2 egg yolks
1/2 tsp almond extract
1 tsp vanilla
1-1/2 cups flour
2 egg whites, lightly beaten
1 cup slivered almonds, chopped finely
1 can cherry pie filling

  • In a large bowl, beat butter with electric mixer for 30 seconds. Add sugar. Beat until combined. Then beat in egg yolks, vanilla and extract until combined. Beat in as much of the flour as you can with mixer, then mix in the remaining by hand. 
  • Cover and chill for about 1 hour.
  • Preheat oven to 375 degrees F.
  • Grease cookie sheets. 
  • Shape dough into 1-inch balls. Roll ball in beaten egg white and then roll in chopped almonds.
  • Place balls 1-inch apart on cookie sheets. Using your thumb, make indentation in each dough ball.
  • Bake for 10 to 12 minutes or until bottoms are brown. Transfer to wire rack and cool completely.
  • Fill each thumbprint with cherry pie filling and a cherry. Serve immediately.

If saving for later use, store cookie without the filling in the middle stacked in an air-tight container with wax paper between layers.

The recipe is from Better Homes and Gardens Special Interest magazine Dec 2011 edition

Tuesday, June 21, 2011

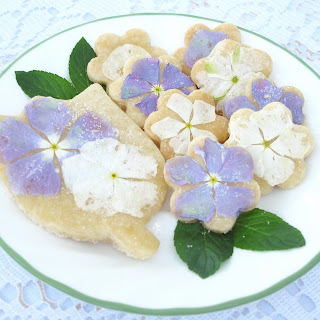
Floral Cookies

I saw these at Stone Gable Blog and had to try them myself.

FLORAL SHORTBREAD COOKIES


1 1/4 cups flour
1/4 cup sugar
1/2 cup butter,
room temp
1/4 tsp vanilla
1 egg white
2 tablespoons water
Pesticide free Pansies or violas

Preheat oven to 325 degrees F. Mix together the flour, sugar, butter and vanilla until formed into a ball. Place between 2 sheets of wax paper and roll out until 1/4 inch (or a bit thinner) thickness. Cut into desired shapes. Bake for 20 to 30 minutes or until tops are slightly browned and center is done.

Wash and pat dry the flowers. Mix together the egg white and water. Put a little of the egg wash on baked cookie, then place flower, and brush the top with more egg wash. Repeat until all are done. Place back into the oven for another 5 to 10 minutes or until egg wash looks dry on top of cookies. If the flowers curl, just pat them back down, carefully, with your finger.

Remove from oven and let them completely cool on wire rack.


~~~~~~~~~~~~~~~~~~~~~~~~~~~~~~~~~~~~~~~~~~~~~~~~~
Don't forget to enter your name DAILY!

Monday, June 6, 2011

PMM #3 & Almond Sugar Cookie Bites

I just realized that I haven't posted this recipe! Eeeeek! Its the best, and the easiest to make on the spot. I like making a huge batch of the cookie part and freeze the ones I'll use later. This is a pampered chef recipe, but I can't find the recipe, so I'm guessing the amounts. Have no fear, this isn't an exact science. Just keep having faith. =)
  ALMOND SUGAR COOKIE BITES


1 cup almonds, chopped up really small
1 package sugar cookie dough [Pillsbury has great dough--in the biscuit section at your grocery store]
3 or 4 small strawberries
2 or 3 kiwi's
4 oz Marscapone cheese
1 cup homemade whipped cream
Lemon zest
1 teaspoon vanilla

Preheat oven to 350 degrees F. Lightly grease a mini muffin pan.

Cut about a teaspoon off the sugar cookie dough and roll it in chopped almonds and place it in one of the mini muffin cups. Repeat until all the mini muffin cups are full. Bake for 10 to 12 minutes or until very lightly brown. Remove to wire rack and cool completely.

Whip together whipped cream and marscapone cheese until blended. Add in vanilla and a tablespoon of lemon zest. Place a dollop on each sugar cookie muffin.

Slice kiwi and strawberries in small slices. Place one of each on each bite and then sprinkle with a little more lemon zest.


Make sure you have enough--they go very quickly!
~~~~~~~~~~~~~~~~~~~~~~~~~~~~~~~~~~~~~~~~~~~~~~~~~
Now for my Penny Meal Monday recipe....
Cookin' for my Captain
CLASSIC MEATLOAF WITH MASHED POTATOES


These are more thing that I keep on hand for such an emergency. It does take an hour to cook, so keep that in mind.

ground beef: $1.49; potatoes: less than $1.00; other add-ins: about $0.75; TOTAL: less than $3.25!

For the meat loaf, mix until blended the ground beef, egg, 1/2 package of crackers [picture shown is full package] a heaping spoon of tomato sauce [shown is paste--grabbed wrong one for picture!] and sprinkle about 2 teaspoons seasoning [shown is what I always use--TexJoy]. After mixing, press into glass loaf pan and cook on 375 degrees F for 1 hour. Serve with mashed potatoes!

Sunday, February 27, 2011

Daring Bakers Challenge: Panna Cotta & Florentine Cookies

The February 2011 Daring Bakers’ challenge was hosted by Mallory from A Sofa in the Kitchen. She chose to challenge everyone to make Panna Cotta from a Giada De Laurentiis recipe and Nestle Florentine Cookies.

PANNA COTTA & COFFEE GELEE


Chocolate Panna Cotta
1 cup whole milk
1 tablespoon unflavored powdered gelatin
2 cups whipping cream (30+% butterfat)
½ cupsugar
¾ cup bittersweet or semisweet chocolate
½ teaspoon vanilla extract


Directions:
  1. Pour milk into a small bowl, sprinkle gelatin over the top, set aside for 2-5 minutes.
  2. Place a medium saucepan over medium heat, stir in cream, sugar and vanilla. Bring to a low boil.
  3. Add chocolate and whisk until melted. Whisk the milk/gelatin mixture into chocolate cream mixture. Whisk until gelatin has dissolved.
  4. Transfer to ramekins, or nice glasses for serving.
  5. Cover and chill at least 8 hours, or overnight
Coffee Gelee
2 cups good quality brewed coffee
1/4 cup hot water + 2 tablespoons cold water
1/2 cup granulated sugar
1½ teaspoons unflavored powdered gelatin
2 teaspoons vanilla extract


Directions:
  1. Place granulated sugar and 1/4 c. hot water in a small saucepan. Bring to a boil, stir until the sugar has dissolved.
  2. Sprinkle gelatin over 2 Tablespoons cold water and let it soften 2 minutes or so.
  3. Stir the coffee, sugar, hot water, and vanilla into a small metal bowl, add gelatin mixture and stir well until gelatin has dissolved. If pouring over Panna Cotta, be sure that this mixture is no longer hot, it will melt Panna Cotta if it is, let it come to room temperature.

Florentine Cookie
2/3 cup unsalted butter
2 cups quick oats
1 cup granulated sugar
2/3 cup plain (all purpose) flour
1/4 cup dark corn syrup
1/4 cup whole milk
1 tsp vanilla extract
pinch of salt
1½ cups dark or milk chocolate


Directions:
Preheat oven to moderately hot 375°F (190°C) (gas mark 5). Prepare your baking sheet with silpat or parchment paper.

Melt butter in a medium saucepan, then remove from the heat.

To the melted butter add oats, sugar, flour, corn syrup, milk, vanilla, and salt. Mix well. Drop a tablespoon full, three inches (75 mm) apart, onto your prepared baking sheet. Flatten slightly with the back of your tablespoon, or use a spatula.

Bake in preheated oven for 6-8 minutes, until cookies are golden brown. Cool completely on the baking sheets.

While the cookies are cooling melt your chocolate until smooth either in the microwave (1 1/2 minutes), or stovetop (in a double boiler, or a bowl that fits atop a saucepan filled with a bit of water, being sure the water doesn't touch the bottom of the bowl).

Peel the cookies from the silpat or parchment and place face down on a wire rack set over a sheet of wax/parchment paper (to keep counters clean).

Spread a tablespoon of chocolate on the bottom/flat side of your cookie, sandwiching another (flat end) cookie atop the chocolate.

This recipe will make about 2 1/2 - 3 dozen sandwiched Florentine cookies. You can also choose not to sandwich yours, in which case, drizzle the tops with chocolate (over your wax paper).


Related Posts Plugin for WordPress, Blogger...